Do you want to start a blog? ![]()
Do you love reading food blog? Want to start a blog? Don’t wait. It is simple! Today is your day to start the blog! 🙂
Here’s how I started and I would like to share it with you.
HOW TO START A FOOD BLOG:
There are only three steps involved:
2.Hosting
I like this part very much. It’s like brainstorming to name a kid 🙂
What do you want your domain name to be?
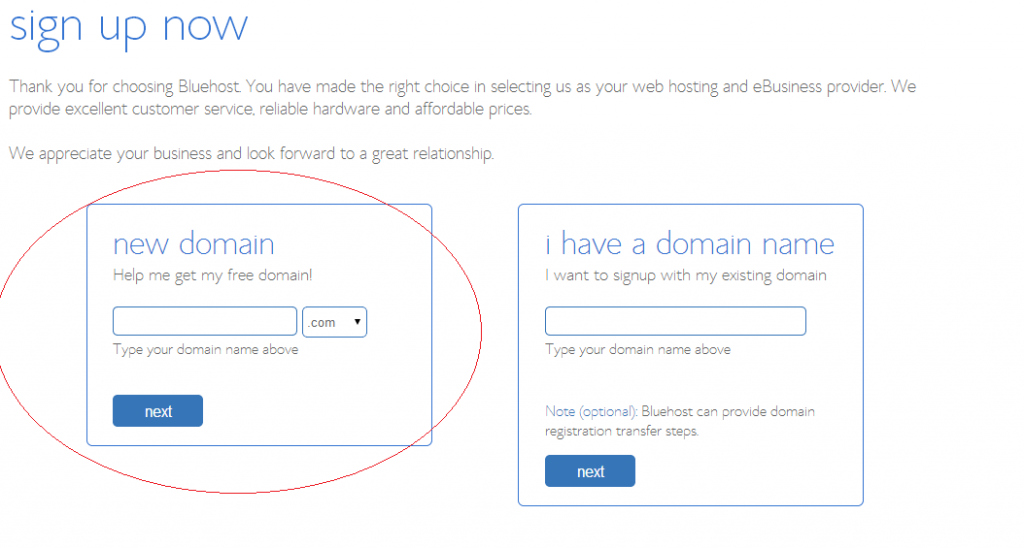
Brainstorm as many as ideas as you can. I would say it should give at least a hint at what your blog is about. Name should be easy to spell, catchy and memorable. Discuss with close ones if you like to, once you think you have couple of potential names in mind of your blog, head to Bluehost to see if the domain is available by typing the name in the box as shown below:
You can also choose .com,.ca … and so on. But my suggestion is try to use .com as it is the standard domain suffix.
There will be lot of names in your choices that are not available. Don’t lose hope!
Disclosure: Please note that some of the links below are affiliate links and I will earn a commission if you purchase through those links at no additional cost to you. I have used all of my products listed below and recommend them because they are helpful and companies I trust.
In all website names in screenshots, I have named it as “relishthebite” as name to make it easy. You would want to replace with yours. 🙂
Bluehost: When you have your perfect domain name ready, you’ll need to host your domain name. Hosting is like renting space on the web to display your blog. If you decide to host with Blue host, they give you great deal and gives your domain name for free. It is a reliable host with great customer service. Actually Bluehost and liquid web have fit that bill. I use Bluehost now.
To do this, Go to Bluehost
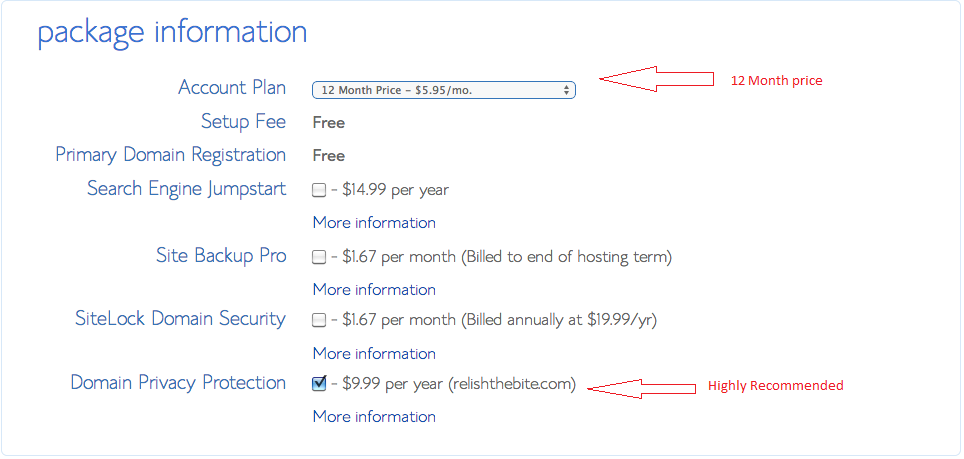
I have pasted the screenshot settings that I used for my package information settings.
The domain whois privacy is optional. But I use it as it protects your personal address and phone number from being displayed to public.
Liquid Web: Liquid Web will be the web hosts when you start getting over 2,000 visits a day. They have good customer service too. And also, if you start with the least expensive shared hosting plan and your blog starts growing very well, you can easily upgrade your plan.
3.INSTALLING WORDPRESS
When the registration with Bluehost is completed, you’ll need to go through the process of installing wordpress.
What is wordpress? WordPress is the most popular blogging platform used by most of the bloggers. A hosting account is needed to run wordpress. A hosting account is basically where your content, images and other files are hosted online so that it can be easily accessed by people. I host mine with bluehost. It is Simple to use and its very easy to install it to your website. I use this software for my website “relishthebite.com”.
I have shown below the screenshots and procedure how to do:
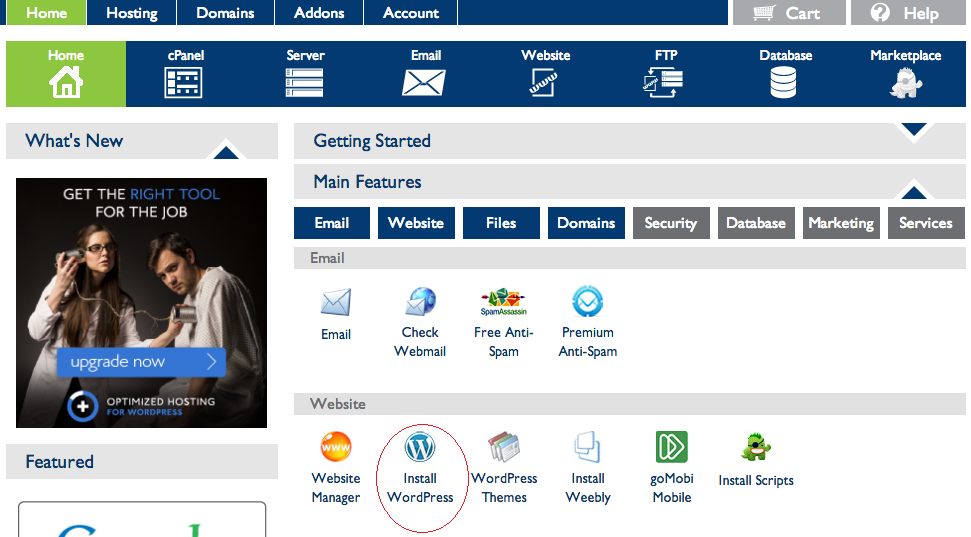
– Login to bluehost and when you scroll down, you will see the software/services section fo the first page. Click on “Install wordpress”
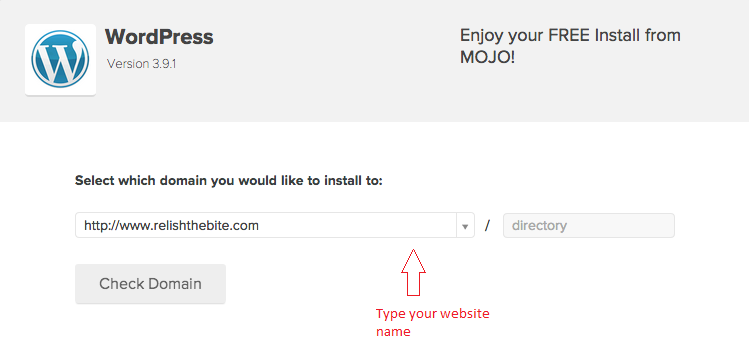
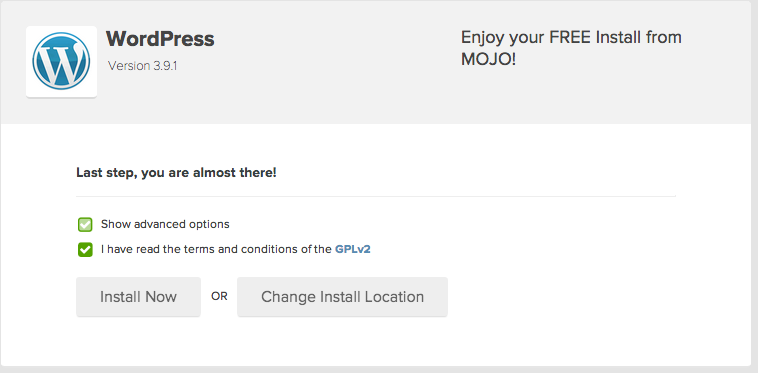
– You will be diverted to a page called “Mojo Marketplace” , click on “start” to install wordpress.
– Click on “show advanced options”
– Clicking on show advanced options will show you a drop down list to input your blog details:
- Type your title in “site name or Title”
- Create a new username in “admin username:.
- Create a new password in “Admin password”. Do not use simple passwords. Your password should be at least eight characters long, it should include numbers, special characters, upper case and lowercase letters.
- Click “Install now”
That’s it 🙂
When the installation is complete, note the login URL, Username and password. You don’t want to lose them. You can always change them personal after, but for the first time you’ll need them for your first time loggig in.
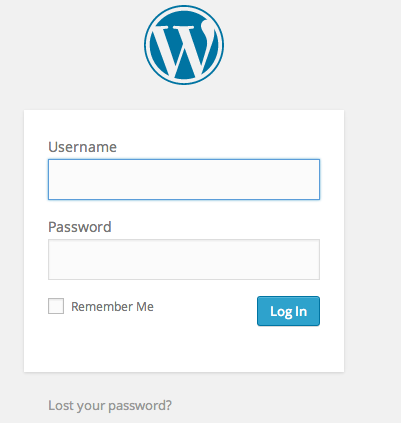
Type your Login URL into your web browser. You’ll see a login screen like below where you can enter your username and password you noted in previous step.
🙂 You know what? You have officially your food blog! Easy? Right!
Can’t wait to launch them and share your chocolate muffin recipe with the world?
You can do lot of customization without needing to know code. A click can change columns to three, two and one.
But before you jump to do all that, don’t you want to make it look more beautiful? It’s time to pick your theme. WordPress has tons of free themes to pick from. You can check the options here.
Your WordPress theme will determine the look, feel and functionality of your website.
If you would like to use a premium theme, check out the options:
1. THESIS THEMES – this was my first option and I highly recommend this, it’s easy and they have a good support team.
2. GENESIS FRAMEWORK– My blog is built on this framework by studiopress. Have a look on the available themes. I believe that studiopress offers the most gorgeous, functional themes. They are mostly responsive and easy to use. And the community forums are helpful, too. My site is built on the LIFESTYLE THEME. But any of their themes would be a good pick. There is a theme called FOODIE THEME particularly great theme for food bloggers.
3. ELEGANT THEMES – It’s easy to use,clean have few options.It’s also bit cheaper than the other premium themes listed. They make lovely themes that are as functional as they are beautiful, and their support is great.
Google Tools:
Set up a google account and email address for your blog. You can also create email address with your website in Bluehost.
When you have the account, login and set up the following tools:
Google Analytics: It helps to track blog traffic. It lets you measure basic information about the visits to the site and about your visitors and where they are coming from and so on.
Feedburner: Allows the visitors to subscribe to your posts by RSS or by Email.
My favorite WordPress plug-ins:
- Akismet: Akismet guards the blog from spam comments.
- Comment Reply Notification: It helps us to send your commenters replies to their comments via email if they leave the “Notify me of follow-up comments via e-mail” box checked. It’s most convenient for the readers.
- Related Posts Thumbnails: A the bottom of each of the posts always have 3 tiny thumbnails with links to similar posts or recipes.
- SocialMediaicons: This social plugin helps to add a Facebook like button,Pinterest Pin-It button,etc. at the bottom of the post.
- EasyRecipe: this plugin will help your recipe’s photos show up in the search results. This formats your recipes for search engine optimization.
- W3 Total cache: this plugin helps us to speed up the page loading time.
Start Blogging!!!
Don’t forget to send me the websites you created using this 🙂 I would love to see them 🙂 !

Hi this was a very informative post. I don’t know if you will remember me. I studied with you in iyyapan tuitions. Ayshwarya.
Thank you so much Aishu 🙂 Aishwarya is a very common name 🙂 so i am not which aishwarya you are. I will mail you privately to your email. 🙂
hi Suku, that’s a very detailed write up to start a blog …. i have been thinking of starting a blog for so long i love cooking and explore new dishes and still haven’t put pullaiyar suzhi …. i just cook & share with my friends along with the recipe ….
Ur TAY and steps wise instructions inspiring me to start a blog …
soon i will start and share with you too .. of course credit to you 🙂
all your recipes and photography are awesome 🙂
Hello Shree, Thank you so much!you should surely start it 🙂 it takes up lot of time adter 🙂 but feels good! so worth it i would say!!!! 🙂 Do the pullaiyar suzhi :)! ask me any doubts if you have :)! Waiting to check your new blog!
Hi Suganya
Thank you so much for your details. I am on my way to start my own blog. Iam just curious on how do you monetize your blog?because i dont see any ads on your page. emails on the same are very welcome.
Hello Mira,Thank you for looking at it. I do monetize via blog. I run ads on my page. 🙂 I do some food blogging opportunities like sponsored post. You can very well do some freelancing photo works for restaurants. thank you.
These recipes are amazing. Please do a madras and jalfrezi recipe